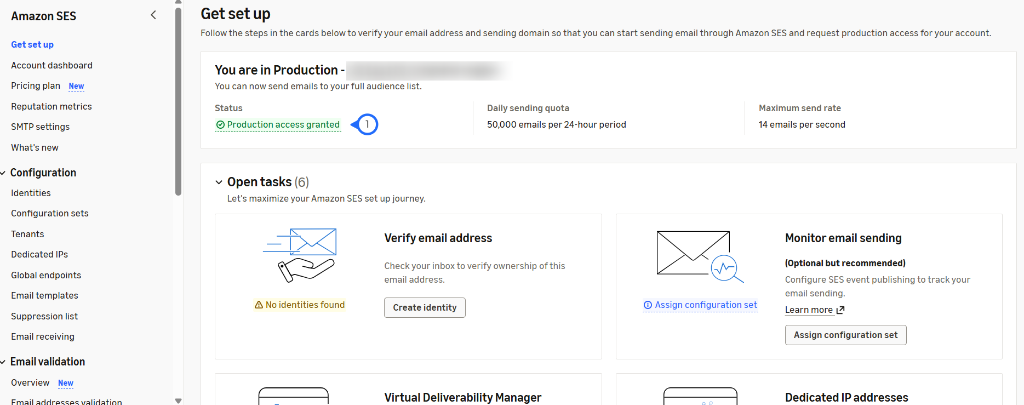
Amazon Simple Email Service (SES)
The product uses Amazon Simple Email Service (SES) to deliver automated email notifications, cost variance alerts, weekly digest reports, and user invitation emails.
Before deploying the product, you must create and verify your sending domain identity in Amazon SES by configuring DKIM authentication in your DNS provider.
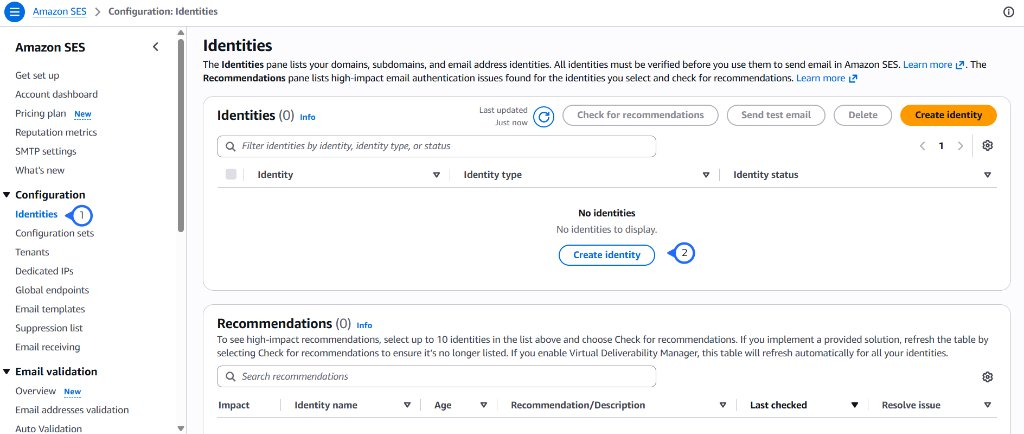
Step 1 - Navigate to Identities in Amazon SES
- Sign in to the AWS Management Console.
- Open the Amazon Simple Email Service (SES) console.
- In the left navigation menu under Configuration, click Identities .
- Click Create identity.
Step 2 - Configure Identity Details
-
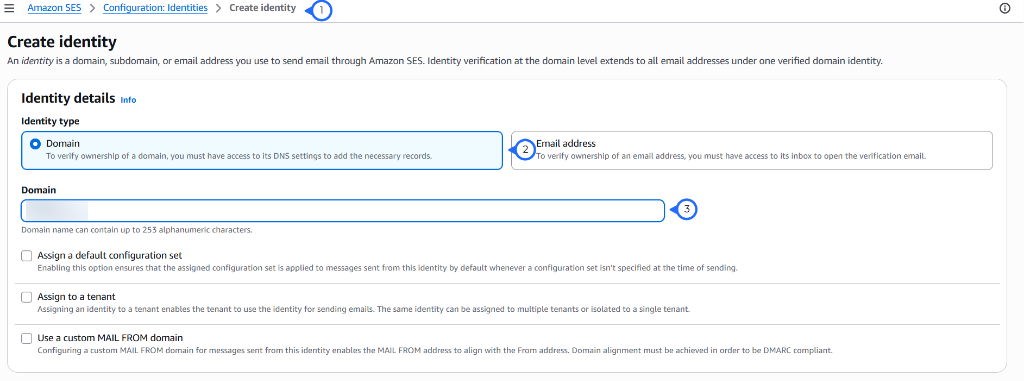
Confirm you are on the Create identity page.
-
Under Identity details, select Domain as the Identity type.
Domain IdentityVerifying at the domain level allows the product to send emails from any address under your domain (e.g.,
notifications@yourdomain.com,no-reply@yourdomain.com) without having to verify each individual email address. -
In the Domain field, enter your organization's domain or subdomain (e.g.,
example.comorapp.example.com).
Step 3 - Configure Advanced DKIM Settings
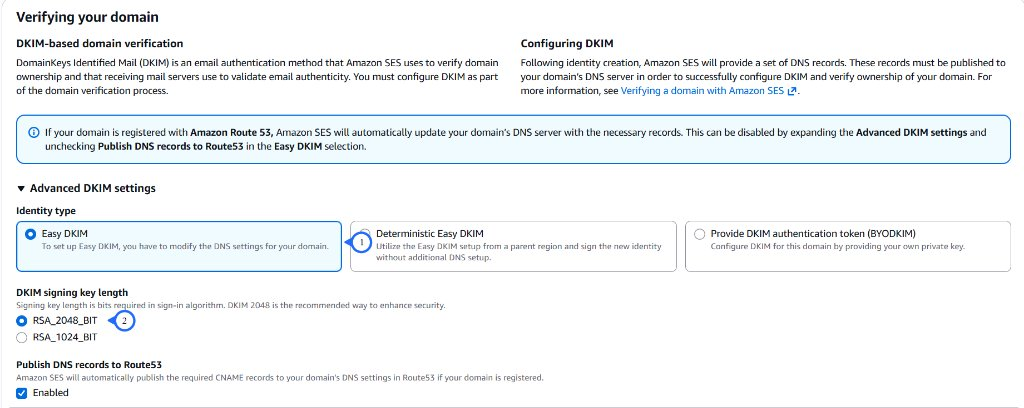
DomainKeys Identified Mail (DKIM) adds a cryptographic signature to emails, proving authenticity and preventing domain spoofing.
- Scroll down to the Advanced DKIM settings section.
- Under Identity type, select Easy DKIM .
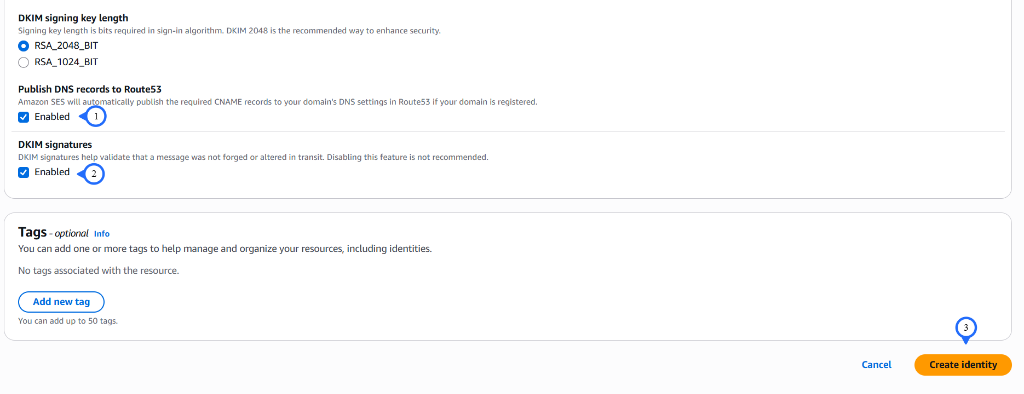
- Under DKIM signing key length, select RSA_2048_BIT (recommended for optimal cryptographic security).
Step 4 - Enable DKIM Signatures and Create Identity
- Ensure DKIM signatures is Enabled to automatically sign outgoing emails with DKIM.
- Optionally add Tags to help identify and manage the resource.
- Click Create identity to finalize domain registration.
Step 5 - View Identity Status
After creating the identity, the domain identity details page appears:
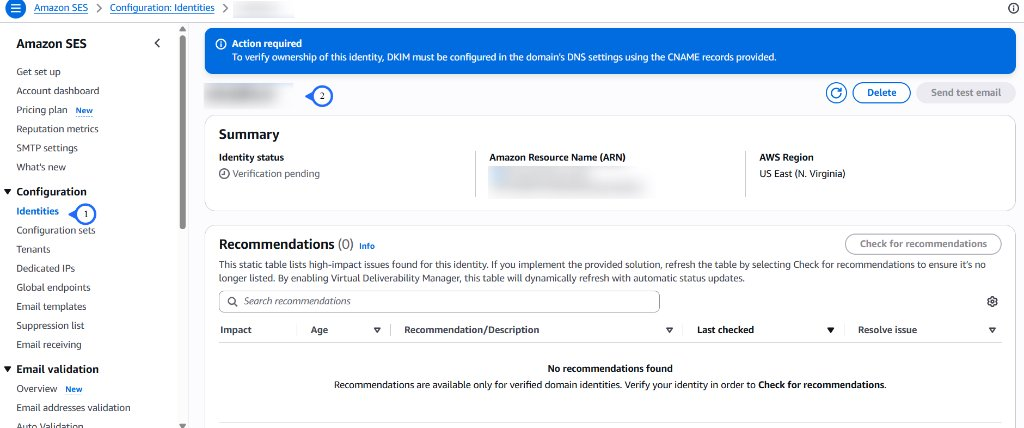
- Navigate to Configuration → Identities in the left menu.
- Select your newly created domain identity.
- At the top of the page, an Action required notification appears:
"To verify ownership of this identity, DKIM must be configured in the domain's DNS settings using the CNAME records provided."
- Under the Summary card, the Identity status will initially display Verification pending with a clock icon.
Step 6 - Publish DKIM CNAME Records in Your DNS Provider
To verify domain ownership and enable DKIM signing, copy the 3 CNAME records generated by Amazon SES and add them to your DNS provider (e.g., Cloudflare, GoDaddy, Namecheap, Route 53, or cPanel):
-
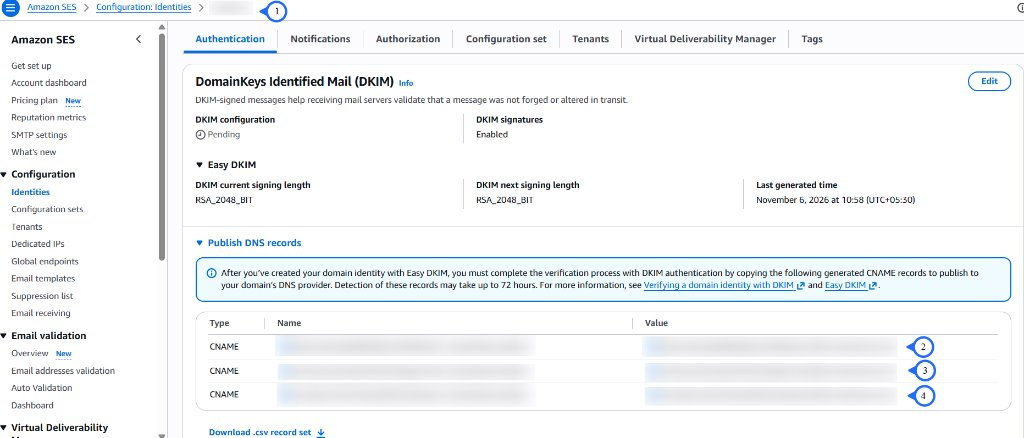
On the domain identity page in Amazon SES, select the Authentication tab .
-
Under DomainKeys Identified Mail (DKIM) → Publish DNS records, locate the 3 CNAME records:
- Record 1:
Type: CNAME|Name: <token1>._domainkey|Value: <token1>.dkim.amazonses.com - Record 2:
Type: CNAME|Name: <token2>._domainkey|Value: <token2>.dkim.amazonses.com - Record 3:
Type: CNAME|Name: <token3>._domainkey|Value: <token3>.dkim.amazonses.com
(You can copy each Name and Value directly, or click Download .csv record set).
- Record 1:
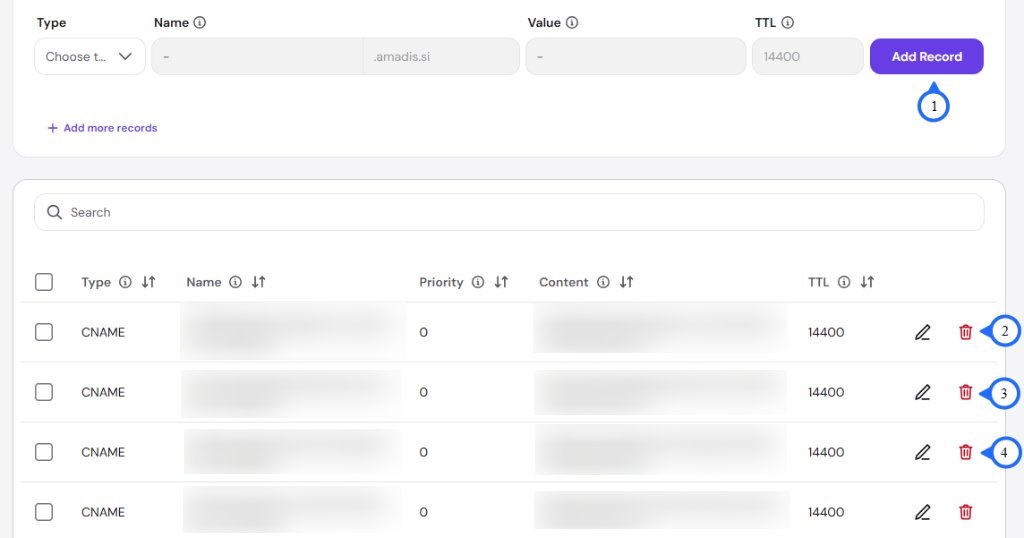
- Log in to your DNS provider's management console and navigate to the DNS Records page for your domain.
- For each of the 3 DKIM CNAME records:
-
Type: Select
CNAME. -
Name: Enter the record name token.
DNS Provider Name SyntaxMost DNS providers (such as Cloudflare, GoDaddy, and cPanel) automatically append your root domain. If your provider does this, only enter
<token>._domainkeyinto the Name field. -
Value / Content: Enter the target hostname .
-
TTL: Set to
14400(orAuto/1 hour). -
Click Add Record .
-
- Repeat and confirm all 3 CNAME records are added to your DNS table (2, 3, 4).
Step 7 - Publish DMARC TXT Record (Optional)
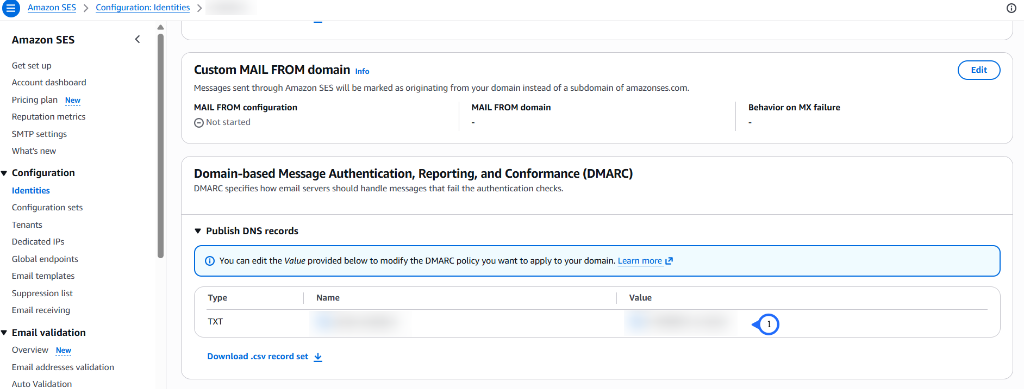
Domain-based Message Authentication, Reporting, and Conformance (DMARC) specifies how receiving mail servers handle messages that fail authentication checks.
- Under the Authentication tab, scroll down to the Domain-based Message Authentication, Reporting, and Conformance (DMARC) section.
- Under Publish DNS records, copy the provided TXT record:
- Type:
TXT - Name:
_dmarc(or_dmarc.<yourdomain.com>) - Value : The DMARC policy string (e.g.
v=DMARC1; p=none;)
- Type:
- In your DNS provider console, add the TXT record:
- Type:
TXT - Name:
_dmarc - Value:
v=DMARC1; p=none; - Click Add Record.
- Type:
- Confirm the TXT record appears in your DNS provider's records table .

Step 8 - Verify Domain Identity Status in Amazon SES
Once the DNS records are added:
- DNS propagation begins across global nameservers. This typically takes anywhere from a few minutes to a few hours (up to a maximum of 72 hours).
- Amazon SES automatically detects the published DKIM CNAME records in your DNS provider.
- In the Amazon SES Console, navigate to Configuration → Identities and refresh the page.
- Once validation succeeds:
- The Identity status changes from Verification pending to Verified with a green checkmark.
- Under the Authentication tab, the DKIM configuration changes from Pending to Successful.

Step 9 - Create Sender Email Address Identity (Optional)
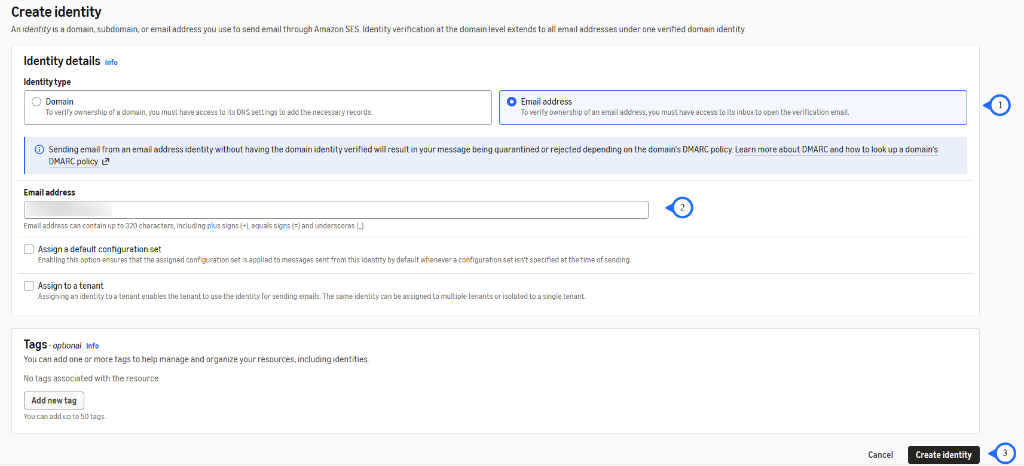
In addition to domain verification, you can optionally verify a dedicated sender email address (e.g., no-reply@app.example.com or notifications@app.example.com) to explicitly authorize individual sending addresses:
- In the left navigation menu under Configuration, click Identities.
- Click Create identity.
- Under Identity details, select Email address as the Identity type.
- In the Email address field, enter your sender email address (e.g.
no-reply@app.example.com). - Click Create identity.
- Amazon SES will send a verification link to that inbox. Open the email and click the confirmation link to complete verification.
Converting from Amazon SES Sandbox to Production Access
By default, all newly created Amazon SES accounts start in the Amazon SES Sandbox environment with the following restrictions:
- Daily sending quota: 200 emails per 24-hour period.
- Maximum send rate: 1 email per second.
- Recipients: You can only send emails to verified email addresses and domains.
To send automated reports, notifications, and invitations to any recipient outside the sandbox, you must submit a production access request to AWS.
Step 10 - Navigate to Request Production Access
-
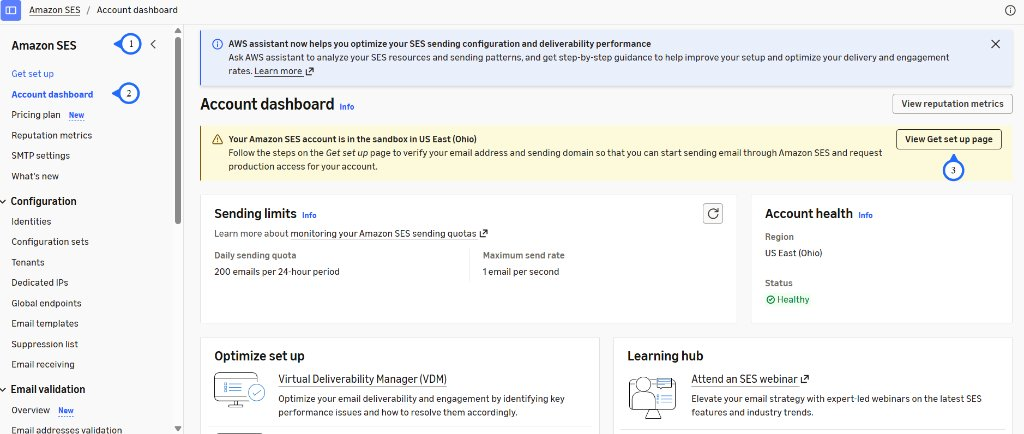
In the Amazon SES console, click Get set up in the left navigation menu, or open Account dashboard instead.
-
On the Account dashboard, a yellow alert banner indicates your account is currently in the sandbox. Click View Get set up page to proceed:
-
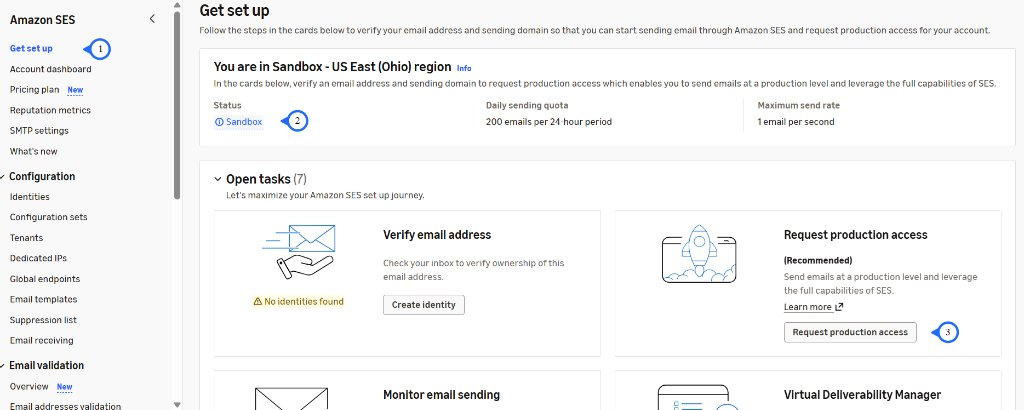
On the Get set up page, the status shows Sandbox. Under Open tasks, locate the Request production access task card and click Request production access.
Step 11 - Fill Out Production Access Request Form
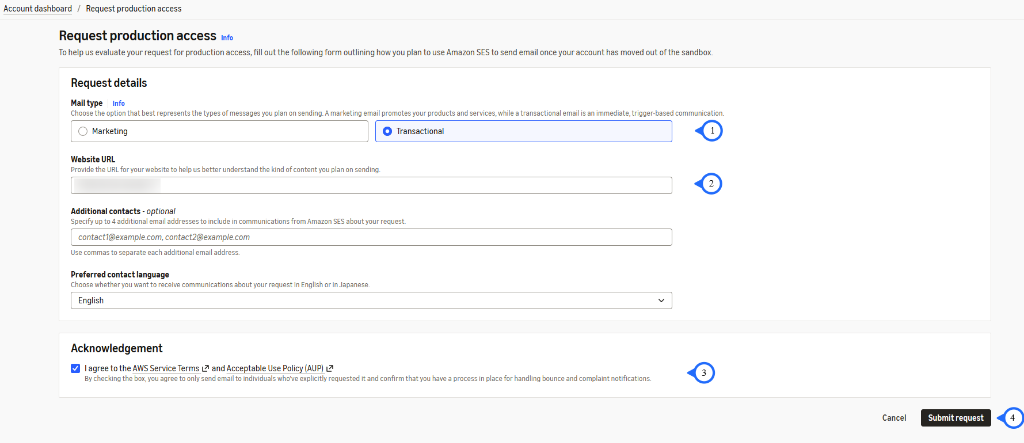
On the Request production access page, provide details on your email use case:
- Under Request details, configure the following:
- Mail type: Select Transactional — automated cost reports, variance alerts, and system invitations are trigger-based transactional emails.
- Website URL: Enter your application or company website URL (e.g.,
https://www.example.com). Your URL will be blurred/redacted here for privacy. - Additional contacts - optional: Specify up to 4 additional email addresses to receive review updates from Amazon SES.
- Preferred contact language: Select your language (e.g., English).
- Under Acknowledgement:
- Check I agree to the AWS Service Terms and Acceptable Use Policy (AUP).
- Click Submit request.
Step 12 - Request Review Process
After submitting your request:
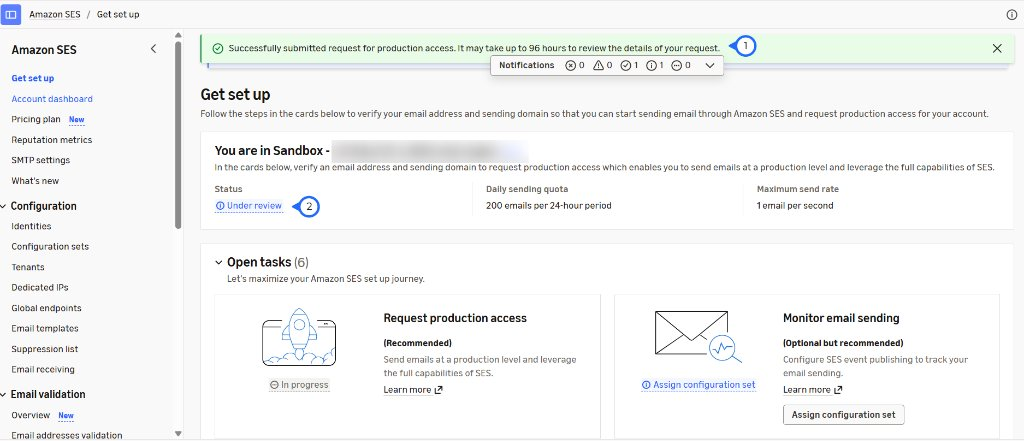
- A green confirmation notification appears at the top:
"Successfully submitted request for production access. It may take up to 96 hours to review the details of your request."
- On the Get set up page, the account status updates to Under review and the Request production access task card shows In progress. Daily sending limits remain at sandbox levels during review.
Step 13 - Production Access Granted
Once the AWS evaluation is complete and approved:
- Return to the Get set up page. The account status updates to Production access granted with a green checkmark.
- Your account now operates at full production sending limits:
- Daily sending quota: 50,000 emails per 24-hour period (or higher depending on your request).
- Maximum send rate: 14 emails per second.
- Your Amazon SES account is fully out of the sandbox and authorized to send emails to any recipient.